By Julie Moir Messervy. All images courtesy of homeowners except where noted.

The original stone garden, featuring hostas and European ginger.
As every gardener knows, a landscape evolves and develops over time, so it’s always fascinating for me to return to my projects to see how they have changed after a span of years has gone by. My very first Cambridge clients called recently to ask me to consult on the garden I first created there thirty years ago. I visited on a cold and rainy day in April to assess the situation (see ‘before’ shots) and figured out an informal work plan, then returned in early May to meet with the landscape contractor, Ariana Loubsky and her son Alex, and made a list that included buying in a pallet of large flat fieldstones and 4 Japanese maples to add to the clients’ collection. Then in late May, my clients, Ariana and Alex and their two colleagues, and I set out the Japanese maples, laid out the stepping stones, made an extension of the brick walkway, and moved plants around to turn a garden that needed refurbishing into a lush and verdant paradise. A few days later, my clients threw a small garden party to celebrate. Here are some pictures of the process.
BEFORE

Before photos: JMMDS.
Left photo: The muddy back yard needed some TLC. I proposed extending the brick to include the base of the steps and decided to replace the small, thin flat fieldstones with larger, thicker material. Center photo: A handsome carved stone sculpture was set far enough from the brick terrace that I decided to create a way to get close up. Right photo: Some years ago in this area, I had created a planted “pool” in a shady wooded area along with a softly curving gravel path bounded by steel edging. It now needed refurbishing.
PROCESS

Before I arrived, the team prepared the site, brought in new larger flat fieldstones, and dug holes for the trees. I used spray paint to suggest the route of the stepping stone path.

We carefully set each tree into place.

As we worked, I explained my theory of stepping stone path design to all the workers, ensuring that what I learned so long ago in Japan would be passed along.

To begin the stepping stone journey, I placed one of the large flat fieldstones into the gravel walkway I had created there some years ago. The largest stones were set at the beginning, ending, and at every decision point along the way.

Alex placed moss in the carved grooves of the stone sculpture, after I set ostrich ferns to one side to give it a lacy backdrop and smaller ferns in front to bring softness to its base.
AFTER

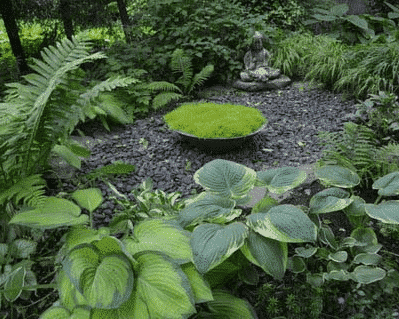
I set some structural stones around the “pool” and as a base for the larger Buddha sculpture, and then moved some of the large-leafed hostas into groupings and placed Ostrich ferns for height. Ariana planted the soft, golden Irish Moss into the metal dish, which I set off-center so that it seems to float on top of the washed river stone surface of the pool.

A smaller Buddha now sits happily on a flat fieldstone beneath an umbrella-like threadleaf Maple (Acer palmatum var. dissectum).

The stepping stone path floats by on the way to the next event—the carved stone sculpture.

The carved stone sculpture can now be seen close-up along the stepping stone path that is set into a field of myrtle (Vinca minor ‘Bowles Beauty’).

A small stone basin is protected by another threadleaf maple, soon to be surrounded by a bed of myrtle.

The path ends at a tall stone lantern that graces the back corner of the garden. From here you can look back to the house and see how the whole garden journey works.


it rocks !!!!!
Nicely done, I love it. Great pictures of the step by step process. The moss in the metal dish and designed on the stone sculpture is a great idea. Looks like it was a real pleasure to do 🙂
I love it – especially the small Buddha under the tiny maple and the stone sculpture. Thanks for sharing the process!
Thank you for these kind comments. I love this peaceful little garden.
Jeff, you’re funny!
You get better as you ripen/mature/surge forward with the nourishment of your roots. Thank you for being unfolding Lotus.
it was such a joy to be a part of this beautiful garden